How to Reduce Image File Size Without Losing Quality
"File too large." It's one of the most common error messages online, whether you're uploading a profile picture, attaching photos to an application form, or emailing pictures to a print shop. Modern phone photos are often 3–5 MB each, while many upload forms accept only a few hundred KB to 2 MB.
The good news is that you can usually shrink an image many times over without any visible loss. We tested each technique on a real photo, and the order you apply them in makes a big difference.
First, check what's required
Before you start, read the upload instructions and note three things: the accepted formats (often JPG, PNG or PDF only), the maximum file size, and any required dimensions in pixels. Knowing these upfront stops you from shrinking a file to the right size only to have it rejected for being the wrong format.
1. Crop away what you don't need
Every pixel you remove is data you don't have to store. Photos of documents often include the table edge, the floor or your fingers; product shots often have empty space around the subject. Cropping makes the file smaller and the image clearer.
2. Resize to the dimensions you actually need
This is the single most effective step. A modern phone photo is around 4000 pixels wide, far more than you need for a screen, a website or a form. Halving an image's width and height leaves a quarter of the pixels, and the file shrinks roughly in proportion.
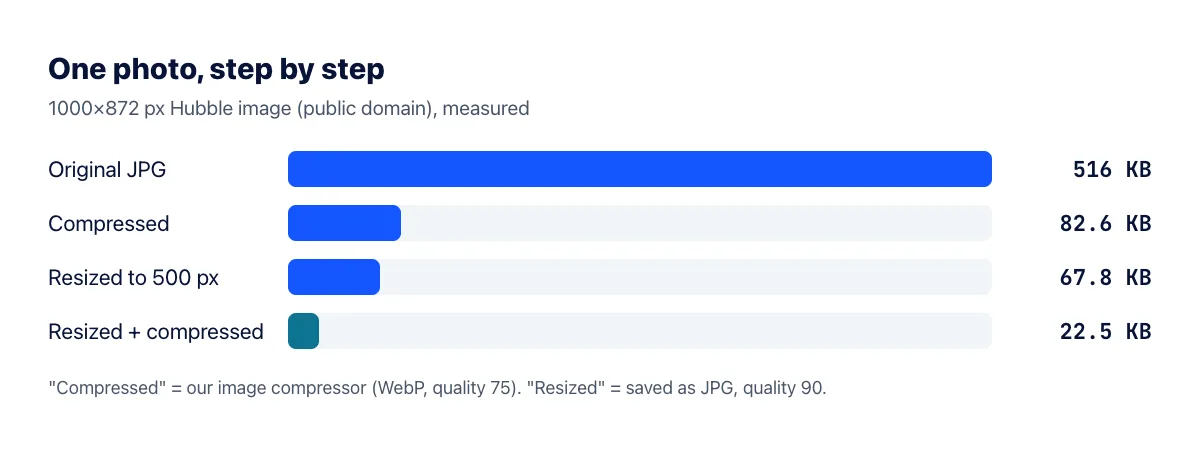
In our test, a 1000×872 photo from the Hubble telescope (a 516 KB JPG) dropped to 67.8 KB when resized to 500 pixels wide and saved as a quality-90 JPG. At 250 pixels wide it was just 20 KB.
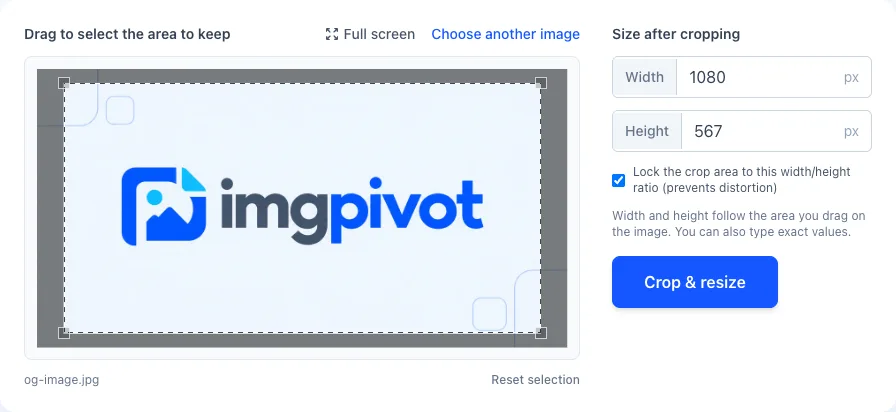
- Open the crop and resize tool.
- Upload your image and drag the frame to crop away anything you don't need.
- Enter the width you want; the height follows automatically to keep the proportions. Then crop, resize and download.
As a rule of thumb, around 1200–1600 pixels on the long side is plenty for documents and photos viewed on a screen. For images on a website, aim for about twice the width they're displayed at.
3. Choose the right format
The same image can differ enormously in size depending on its format. In our PNG vs JPG test, a photo was 610 KB as a PNG and 70 KB as a JPG. If your photo is a PNG or a HEIC file, converting it to JPG is often enough on its own.
| Image type | Best format | Why |
|---|---|---|
| Photos, scans of documents | JPG | Small, accepted everywhere |
| Screenshots with text | PNG (or JPG if PNG is too big) | PNG keeps text sharp but is larger |
| Images for your own website | WebP | Smallest for the quality, all browsers support it |
| Several pages of documents | One file, easy to upload |
Use image to JPG or HEIC to JPG to switch formats.
4. Compress
Compression re-saves the image at a lower quality setting, discarding detail that's hard to see. Our image compressor saves images as WebP at quality 75 with its most thorough compression mode. On the full-size Hubble photo, that alone took the file from 516 KB to 82.6 KB.
Combining steps is where the real savings come from. Resized to 500 pixels and compressed, the photo came to just 22.5 KB, 96% smaller than the original.
One caveat: our compressor outputs WebP, which is ideal for websites but not accepted by many upload forms. If a form only takes JPG, resize and save as JPG instead; that alone usually gets you under the limit.
Tips for keeping images sharp
- Start with a good photo: steady, well lit and filling the frame. A sharp original stays sharp after shrinking; a blurry one only gets worse.
- Resize before compressing, not the other way around.
- Don't compress the same JPG over and over. Each lossy save discards more detail. Always work from the original.
- After shrinking, zoom in and check that small text, numbers and fine details are still readable.
Frequently asked questions
Does removing EXIF data reduce file size?
A little, typically a few KB to a few dozen KB. It's worth doing for privacy, but it won't solve a "file too large" error on its own.
How do I get an image under 100 KB?
Resize it first, then compress. How far you need to go depends on how detailed the photo is. Our very detailed Hubble test photo was still 253 KB as a 1000-pixel JPG, but 82.6 KB once compressed, and 67.8 KB as a 500-pixel JPG. A simpler photo, like our 600×400 coffee cup, was 70 KB as a JPG at full size. If you're still over the limit, reduce the dimensions further.
Why is my screenshot so large?
Screenshots are usually saved as PNG, and high-resolution screens produce very large images. Crop to the part you need, and convert to JPG if the screenshot contains photos or gradients.
The bottom line
Work in this order: crop, resize, choose the right format, then compress. In our test, those steps took a 516 KB photo down to 22.5 KB, and most phone photos will drop well under any upload limit while staying perfectly clear.